


WordPress CMS and HubSpot are two incredibly powerful platforms, which is why many businesses opt to use both to power their website and marketing efforts simultaneously.
For WordPress users specifically, a HubSpot Private App can establish a secure connection between HubSpot and WordPress, facilitating seamless data exchange to manage content, contacts and marketing campaigns across both platforms efficiently.
That type of connection can enhance your marketing strategy since it ensures consistency across both platforms. We have a great example a lot of folks love to employ: using a Private App to display recent HubSpot blog posts on a WordPress site.
We'll break down that example for you, and give a little bit more insight into where you might employ a Private App in your own way to simplify marketing processes.
Remember: to create a Private App, you need a Content Hub Professional or Enterprise account and Super Admin access.
Understanding HubSpot Private Apps
A HubSpot Private App is a custom-built integration that securely connects HubSpot with external platforms like WordPress. Unlike public apps available in the HubSpot App Marketplace, Private Apps are tailored for specific use cases and not available for everyone.
Private Apps extend HubSpot's functionality by integrating with external APIs or services. They are ideal for businesses needing custom solutions or integrations with proprietary systems, and have a much broader application. With a little bit of coding knowledge (in our example, PHP and JSON), you can connect to different external platforms aside from WordPress in a myriad of ways like:
- Including code snippets in a chat bot
- Authenticating API requests in a custom code action in a HubSpot workflow
- CMS serverless functions
Creating Your Private App
Access Private Apps in HubSpot
- Navigate to your settings by clicking the gear icon in the upper right corner
- In the left sidebar, under Account Setup, select Integrations > Private Apps
Create a New Private App
- On the Private Apps page, click the "Create a private app" button
- Fill in the Basic Info tab where you can give your app a name, optional logo and description
- In the Scopes tab, select the permissions your app needs—it is recommended to keep the number of scopes to an absolute minimum
- Webhooks is where you can set up HTTP callbacks that trigger actions in external systems—think a new contact being created, a form being submitted or a deal being closed
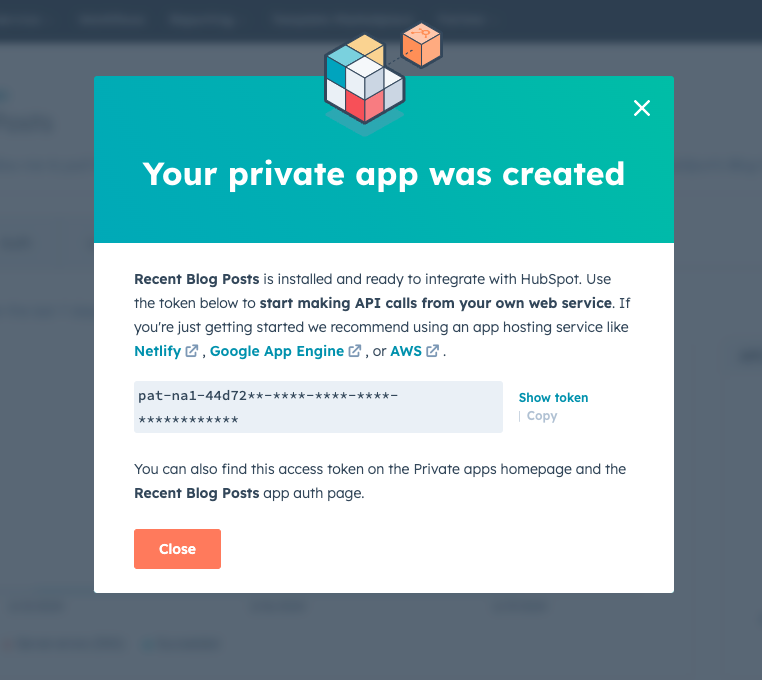
Generate the Access Token
- Click the "Create app" button
- A warning will appear to share the access token only with trusted sources—confirm to proceed
- Copy your access token from the popup or retrieve it later from the Private Apps section in your settings
Testing Your API Request
If you're hoping to test out your API call to see what the response looks like, you can use tools like Postman to view the response in a more structured format that makes it easier to identify relevant data for your integration.
Using a Private App to Connect to WordPress
HubSpot and WordPress Blog Posts Integration Example
For our example, we created a simple, one-page WordPress site using the Block editor (formerly known as Gutenberg). Additionally, we have utilized Advanced Custom Fields (ACF) Pro to create a field on a theme settings page (option page) for the access token.
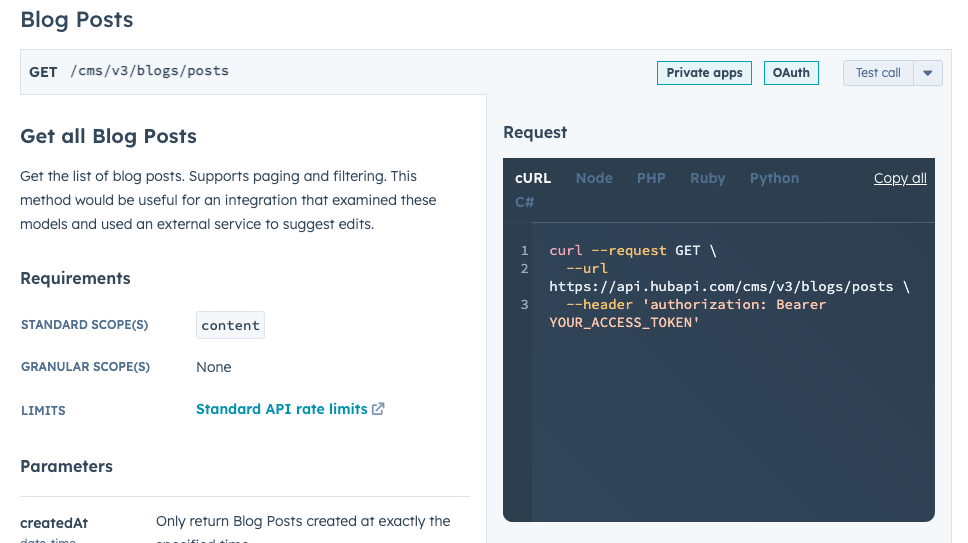
- HubSpot Blog Post API
- Before you go about creating the WordPress block to retrieve blog posts, make sure you utilize the HubSpot Blog Post API to access and retrieve data from your HubSpot blog.
- Refer to the official developer documentation provided by HubSpot—it outlines the API endpoints, request parameters and the structure of the response JSON. Understanding the response JSON is particularly useful as it helps you identify the properties in the results that you need to reference when displaying the blog post details.
- Set and Validate Your Access Token
- Choose between hardcoding your token into the template file, or use a field so that admins can update the token on the theme settings page whenever it's rotated.
- Make sure the field value is not blank!
- Set Parameters and Construct the Request URL
- Depending on the parameters you'd like to include, make sure you are including all the necessary code. We like to include the following query parameters:
- The limit—specifying that we only want three posts returned.
- The type—specifying that we only want posts that are published.
- The time—specifying that we want the most recent posts, so we’re using the createdAt parameter with a minus/negative sign before (minus/negative sign indicating a descending order)
- Depending on the parameters you'd like to include, make sure you are including all the necessary code. We like to include the following query parameters:
- Set Request Headers
- This is where you indicate information such as the authorization token, content type and more.
- In our case, we include an authorization header that contains the access token required to authenticate the request to the HubSpot Blog Post API: 'Bearer ' . $token
- Make the Request and Get the Response
- In WordPress, it's much easier to use built-in HTTP request functions to simplify the process of interacting with external APIs. For example, using wp_remote_get() instead of a standard PHP.
- If we use wp_remote_get($url, array('headers' => $headers)) to make a GET request to the specified URL ($url) with the custom headers ($headers) we set earlier—the function returns the response from the API, which we can then use to extract and display the blog post data.
- Check for Errors
- If an error is detected, WordPress will retrieve and display the error in the is_wp_error() function.
- Outputting the Blog Posts
- Once this is complete you can access an array of post objects based on the JSON response that Postman provides—it will give all the names of the properties for each post object so you can extract and sanitize the necessary data.
- Check the post URL and construct the HTML markup for each post.
- Style to your preference—we used Tailwind CSS classes, which provide basic styling for each post, such as spacing, borders, shadows and font styles. This is NOT essential for the functionality of the code.
- If no posts are found in response, we can display a message indicating no posts were found.
That's it! While there are more nitty gritty details, copy/paste code blocks, troubleshooting and considerations located in our full guide, we hope this example gives you an idea of how you might use a HubSpot Private App in a completely different application (of course, you can always copy this example, we won't mind 😉).
If you prefer a more visual approach, check out our HubSpot Helper Video!
